1 Exam management and creation
OwnExams.com is an extremely simple and practical application for creating and managing online exams or quizzes, which is intended for a wide group of people, especially schools or companies, and therefore teachers, professors, lecturers or instructors (hereinafter referred to as "user" or "test person") and their pupils, students or course participants (hereinafter referred to as "test person"). Its practicality and biggest advantages are that:- makes it easier for the user,
- reduces the organization's paper and toner costs,
- provides objective evaluation of examed persons without the possibility of copying,
- is fully compatible with all operating systems, smartphones and tablets,
- it does not need to be installed
- all data is available online immediately after logging in from any device.
The OwnExams.com web application is available in both free and paid versions. The free version allows full use, the possibility of an unlimited number of users in a group, an unlimited number of online exams and questions, an unlimited number of online exams, access to all online exam settings, access to online exam results and study material. The paid version does not show ads and allows you to:
- automatic creation of a certificate for a successfully performed online exam,
- creating a closed user group for performing an online exam,
- access to comprehensive statistics for your online exams,
- Possibility to charge for the result of the online exam using an SMS message.
1.1 Registration
1.1.1 User Registration
1.1.2 Group Administrator Registration
1.1.3 Group Member Registration
1.1.1 User Registration
User registration is free and required to gain access to create and manage tests, exams or quizzes through your account. The OwnExams.com web application offers two user registration options:- group administrator registration
- group member registration.
If one user who is a member / administrator in several groups in one of them changes his e-mail or password, the system will no longer recognize in which groups he is registered. This change must therefore be repeated in each group separately.
If a user in more than one group uses the same e-mail but different passwords, the system logs him in to the group in which he uses the used password.
1.1.2 Group Administrator Registration
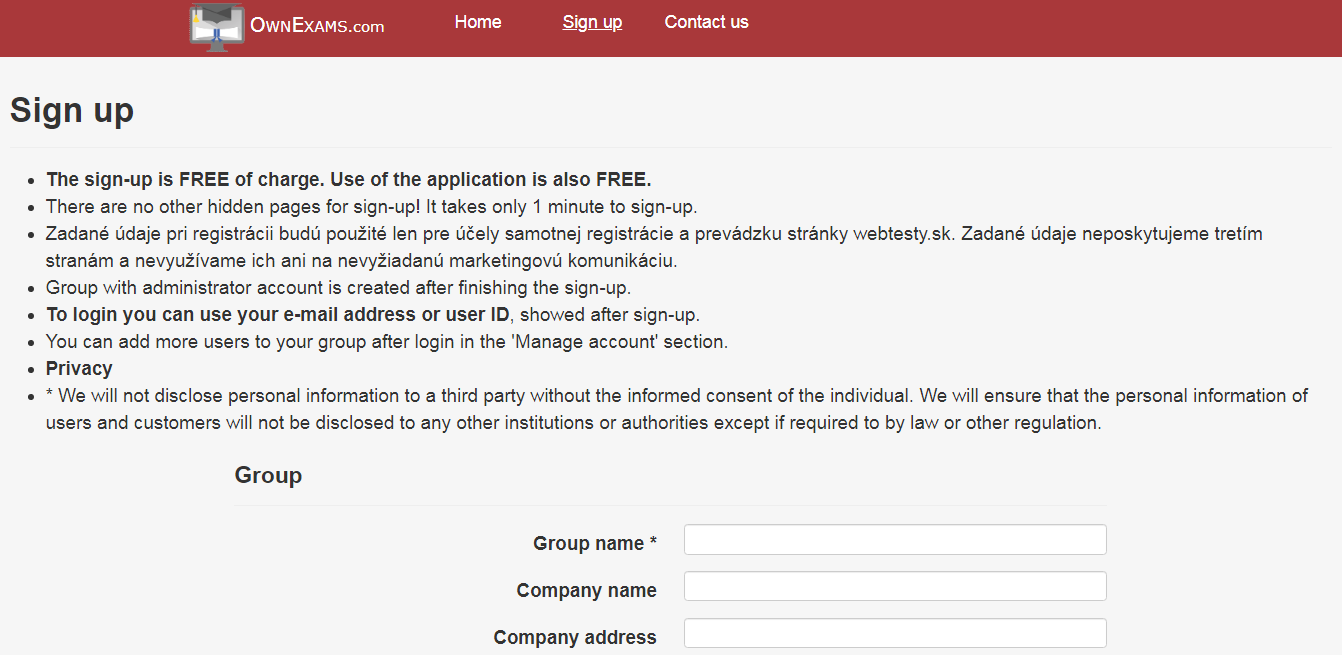
The user simply registers by clicking on the link „ Registration“ in the top bar of the website.In part of„Registration“ it is necessary to fill in especially the mandatory data - marked with an asterisk. In this form registration is required define a group name, which the user will manage. Optional parts of the registration, such as details of the company (its name and address), or details of the natural person who wants to register the group, may also be listed here.
To register a user, it is also necessary to fill in:
- name and surname of the user;
- an e-mail to which he will receive a confirmation of registration together with login details (i.e. ID and group name, user ID and password);
- password - must contain at least 6 characters;
- password confirmation.
After registering, the user automatically becomes the administrator of the created group and can add other users. If the user wants to become a member of another group, he must contact its administrator, who will register him.
1.1.3 Group Member Registration
The group administrator adds new group members in the account management in the section "Registration of a new group member", where it is necessary to fill in all required data (name, surname, e-mail, password and password confirmation). -mail that was used during registration One user can be added to more than one group.
1. 2 User Login
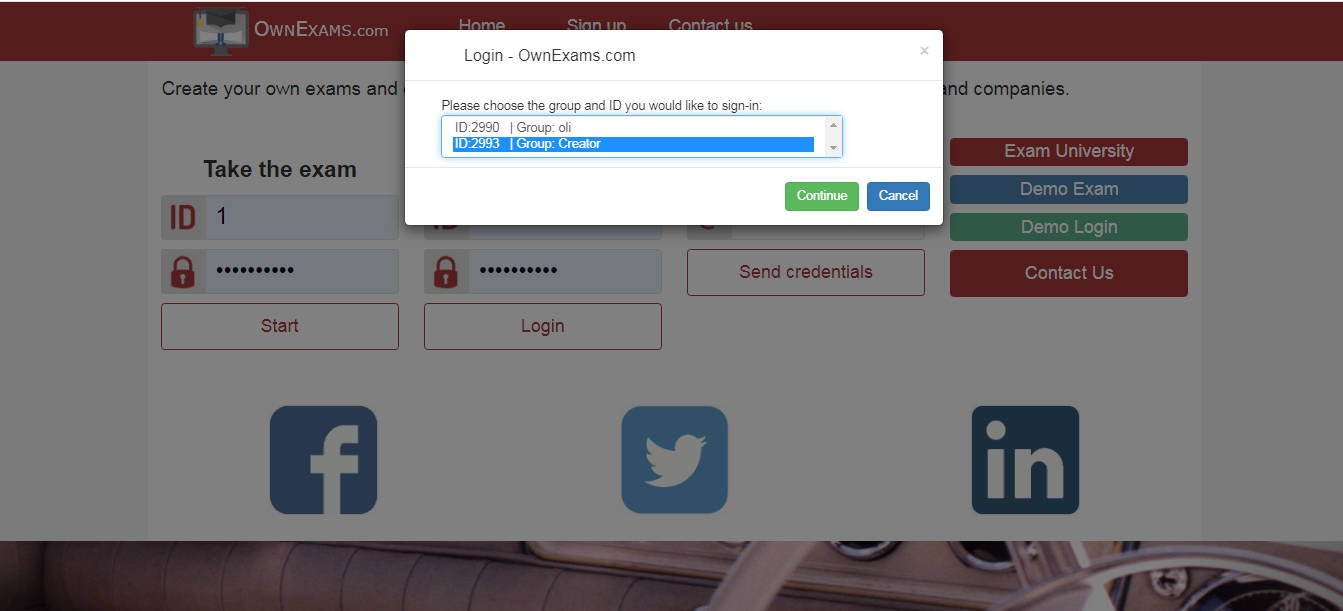
When logging in, the system prompts a user who is a member / administrator in several groups to select the group in which he wants to work.< br />
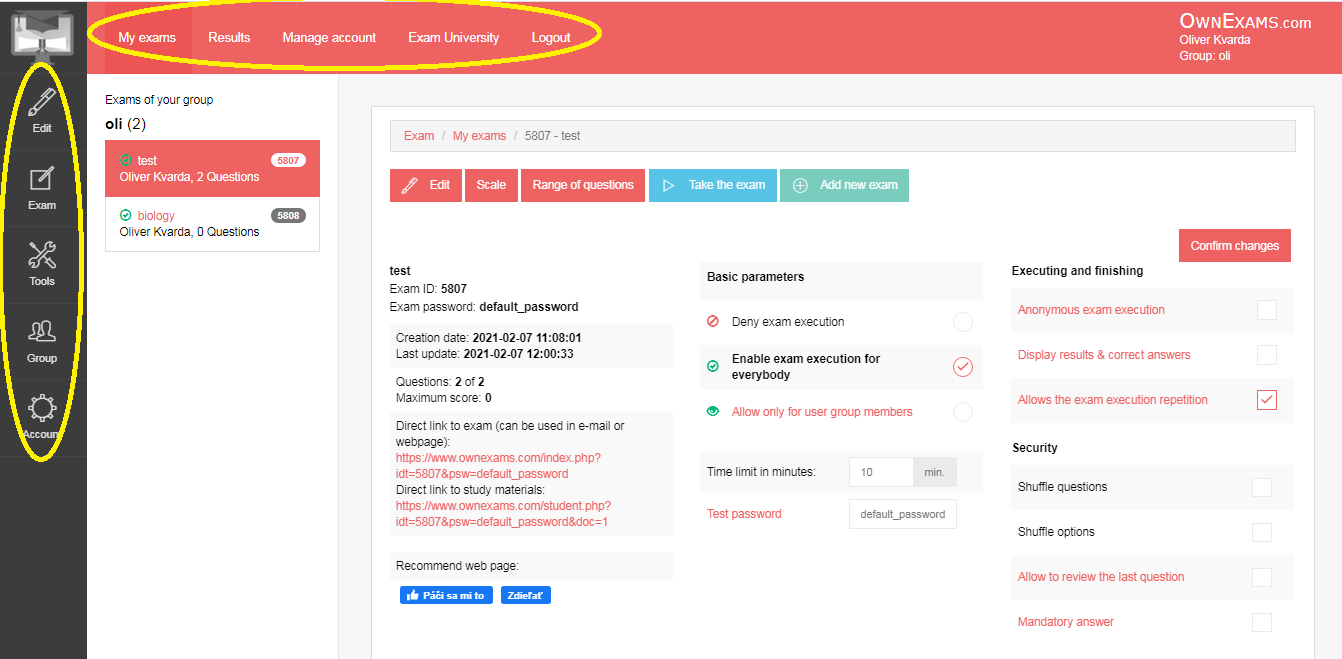
After logging into the system, the user will see a window with a list of all tests, exams or quizzes of the group, which serves as a gateway to other functions regarding the management of tests, exams or quizzes, their parameters, editing, results or statistics.
For their work, the user can use quick access to the most used tools - "My Exams", "Results", "Account Management", "Exam Catalog" and "Logout" at the top or a set of tools at the side of the page. With this set of tools, you can easily create, edit, and manage tests, exams or quizzes, a group, and your account.
1.3 Group management
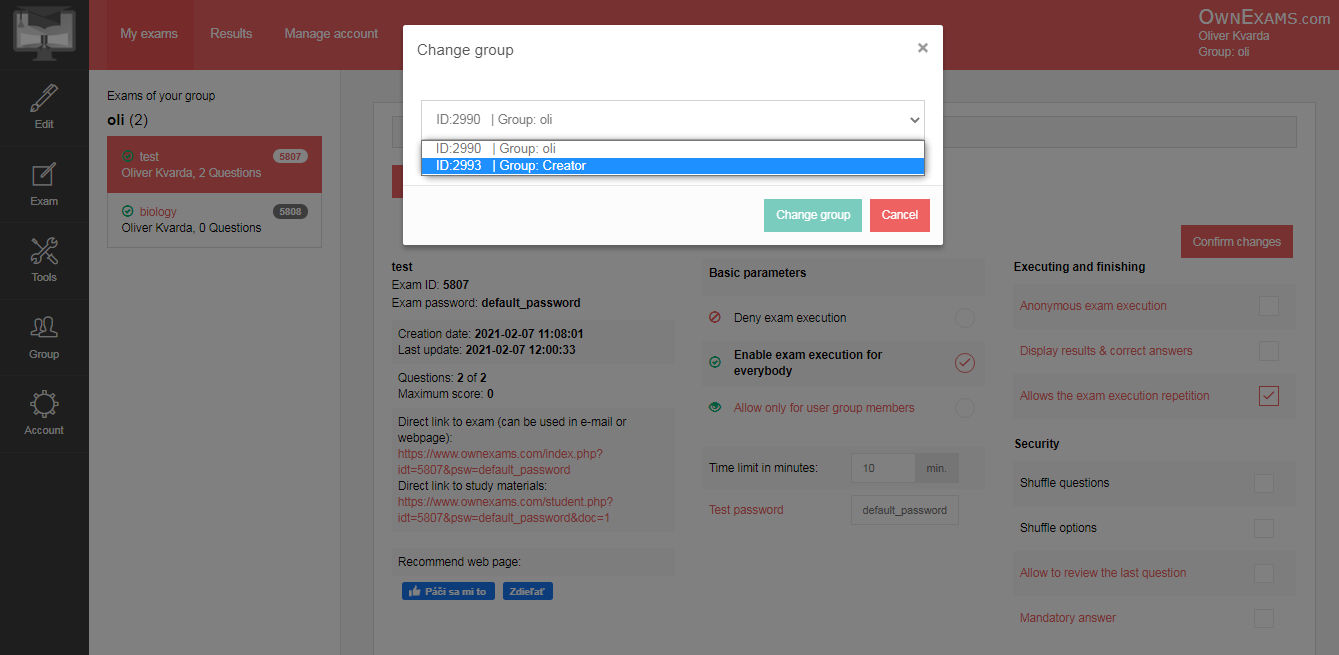
One company (eg a school) can create an unlimited number of groups. Each group can have a maximum of two administrators defined. Each member of the group can create individual exams, edit, correct results, etc. Exams are shared within a group that can have a maximum of two administrators. Each group administrator can change the group settings, the group name and password, the password of other members of the group (in case the user forgets their login password), and activate and deactivate other members of the group. A group member can change their password and details.If the user decides to work in another group, they do not have to vote. All you have to do is change it via the "Group" -> "Change group" tool and select the one you want to join in the list of groups.
1.4 Account Management
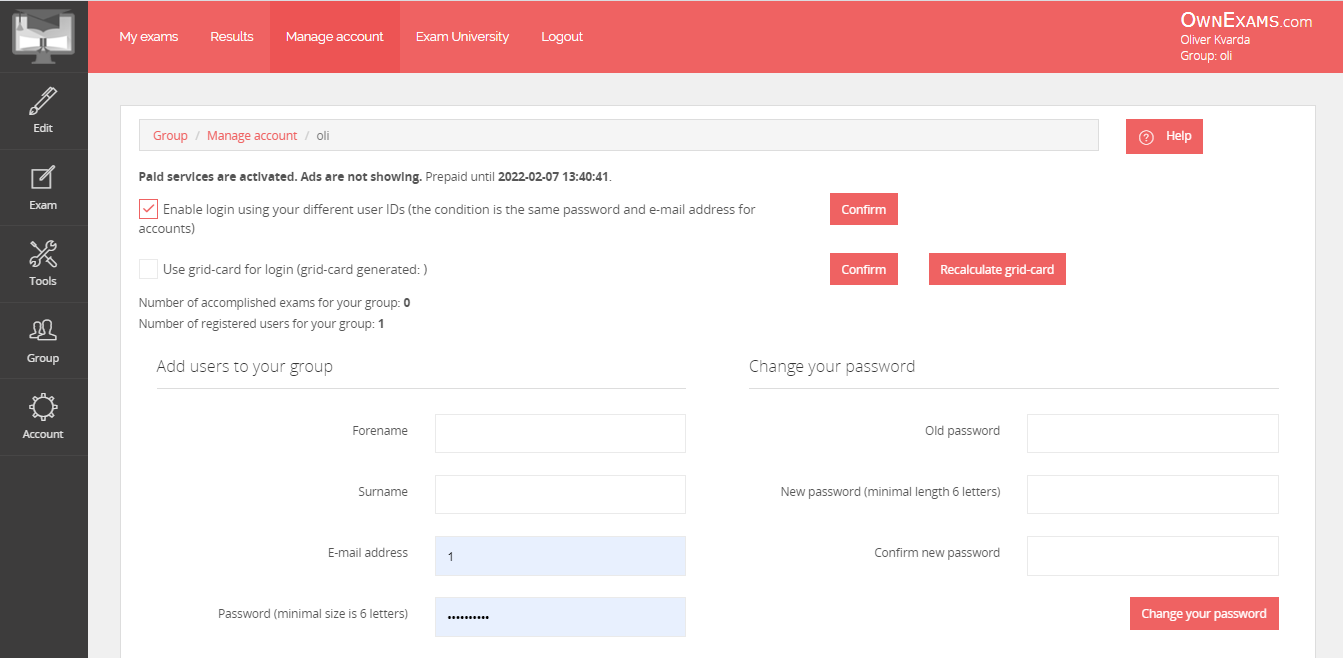
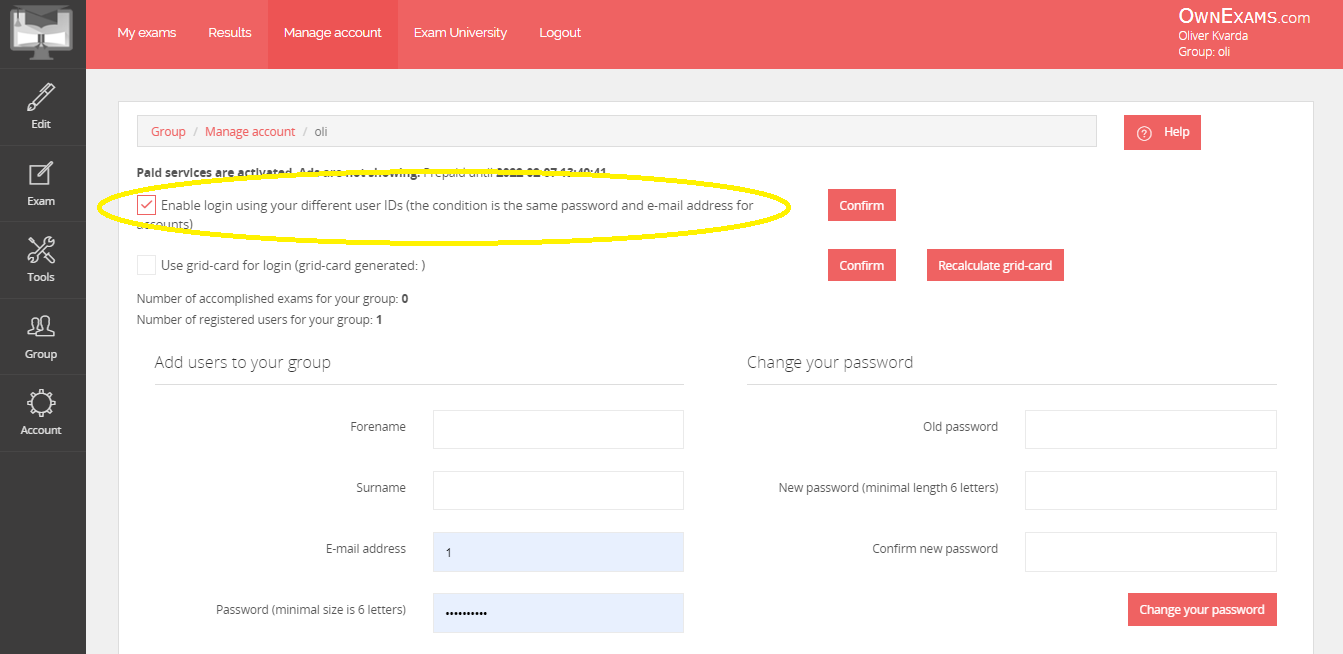
In the account management, the user can choose to log in with a different ID or log in using a grid card. It can use both functions at the same time.Logging in with a different ID is useful if one particular user is an administrator / member in multiple groups. In each group, the system assigns it a different ID through which it can log in. When logging in, the system will provide the user - member / administrator of several groups via the pop-up window with the option to select the group to which he wants to log in (if he is allowed to log in under another ID). If logging in is not allowed under another ID, the system logs it in to the group in which it is registered under the ID with which it logged in. If he logs in via e-mail, while he is not allowed to log in under another ID, the system logs him in to the first group in which he became an administrator or a member.
Because individual accounts managed by one user are not linked, we do not recommend disabling logins under a different ID, as this change will not affect everyone equally.
Example: user manages 3 accounts. He is a member of two groups and manages one as an administrator. In groups where the member is unsubscribed, login under a different ID. He logged in to the group whose ID he entered using ID. When he logged in via e-mail, the system logged him in to the group in which he was first registered. When logging in, the system no longer invited him to choose the group in which he wants to work. You had to remember all your login IDs. After a while, he changed his mind and wanted to allow logging in under a different ID. However, he did not remember in which groups he canceled this function, and he had to allow it in each so that he could re-choose which group he wanted to join directly when logging in. He could only access other groups via the "Group" -> "Change group" tool (if he had the same e-mail and password defined in them).
If the user insists on logging in after a specific ID, we recommend disabling this feature in only one group (ideally in the first one in which he was registered).
Logging in with a grid card is another form of protection for a registered account. After generation, the grid card must be printed out and stored carefully. If the user chooses this option, he will not log in without using the grid card after logging out. The grid card can also be regenerated. But then he has to print it again, because the old grid card becomes invalid. In case of problems with the grid card (eg loss of the grid card) or when logging in, it is necessary to contact the administrator of your group. The group administrator can allow or block specific users from logging in through the grid card.
Example: If a user loses their grid card, they cannot log in to the application without it. In this case, he must contact the group administrator, who can block the login using the grid card, allowing him to log in without using it only with his ID and password. He can then generate a new one if the group administrator allows him to use the grid card again.
In the account management, it is possible to check and change your data or group data in white boxes. Data in gray frames cannot be changed.
At the same time, the user and the group administrator can:
- change some of your group's data (in white boxes)
- changes the e-mail of your account (in which case the administrator's e-mail will also change),
- activate / deactivate users,
- change or define a second administrator,
- changes the password of other members of the group,
- allow / prohibit the use of the grid card by other members of the group,
- sees the activity of group members.
User who is not a group administrator:
- cannot change the group data
- he can change his login password and some data of his account (name, surname, e-mail).
- cannot provide an email that is identical to the group administrator's email,
- can see the activity of other members of the group and their recent logins.
1.5 Creating tests, exams or quizzes
1.5.1 Creating an exam and questions
1.5.2 Types of questions
1.5.3 Exam parameters
1.5.5 Scope of questions
1.5.1 Creating an exam and questions
The user creates a new exam in the "Exam" section, where he enters "New Exam". Then a box with a blank line will appear, in which you enter the name of the exam you want to create. After entering the exam name, you can start creating exam questions.Using the individual exam question editing functions, it is possible to save, delete, or add an image to the question.
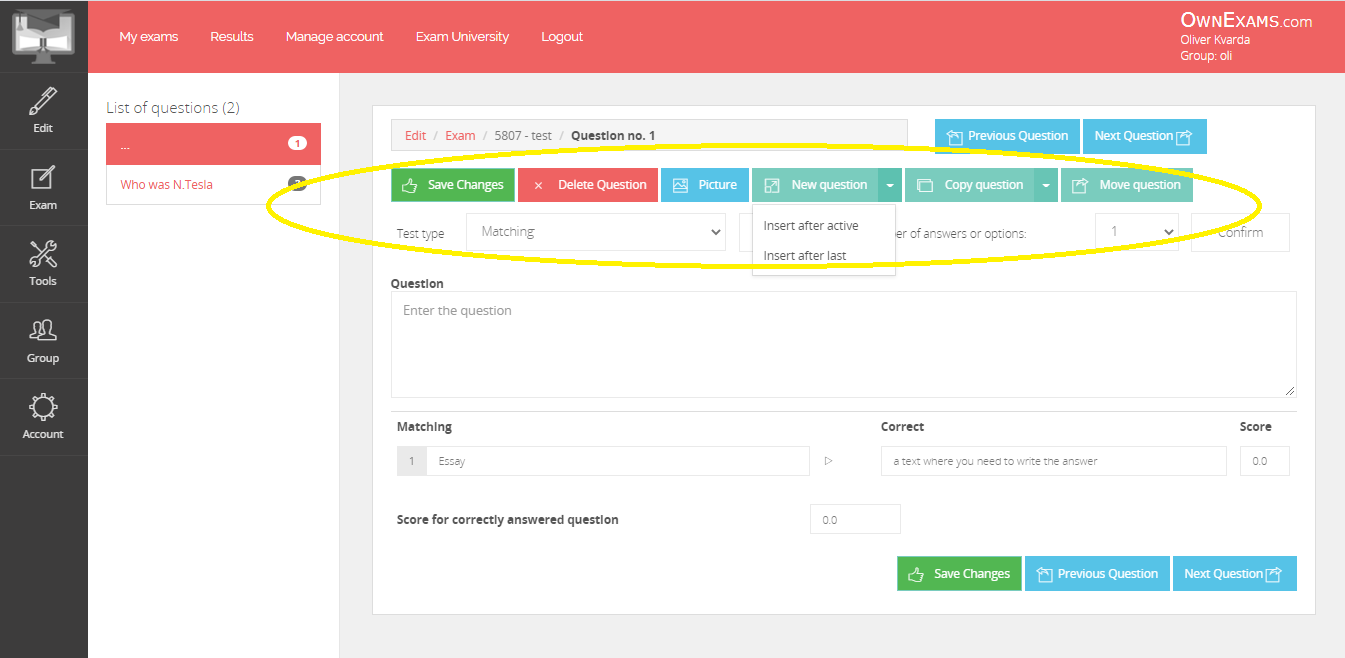
Depending on the user's choice, a new question or the copied selected question can be added after the current question or after the last question. Questions cannot be copied to another exam. The "Back" and "Next" buttons are used to move between exam questions.
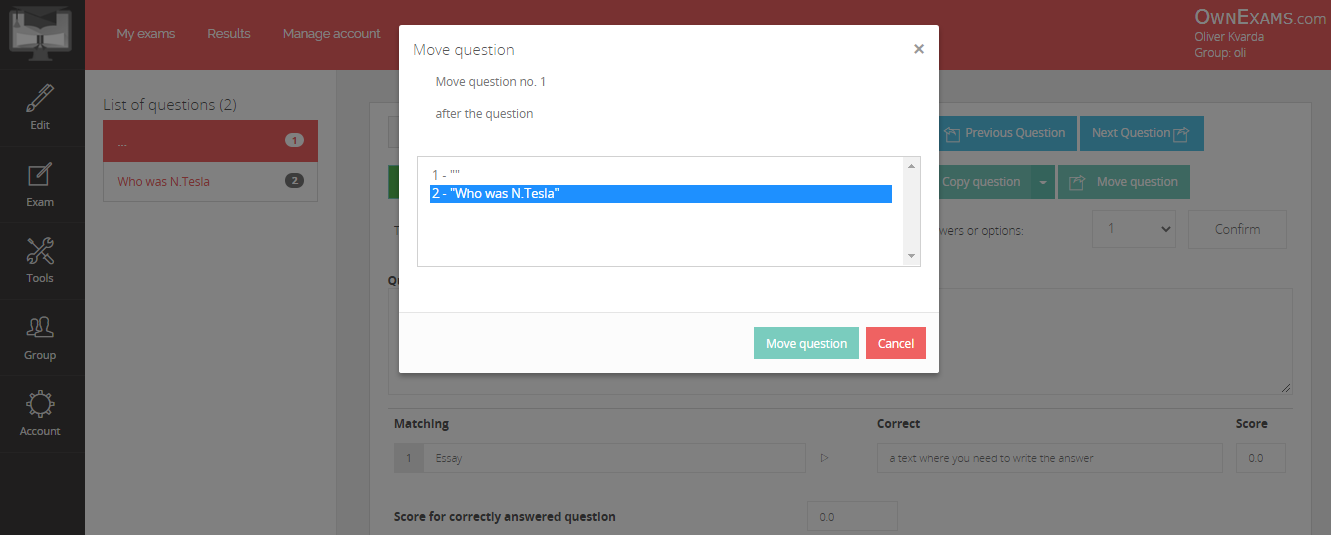
Questions can also be moved in one exam. After clicking on the "Move question" function, a selection of all exam questions will be displayed. The user marks the one for which he wants to move his question.
After selecting the type of question as shown in the figure, you need to confirm the selection and choose the number of answers or options. The user then enters the wording of the question in the text box and enters the correct answers. An appropriate number of points must be assigned to each correct answer. The total number of points for a correctly answered question is given below the fields of correct answers.
1.5.2 Types of questions
A / Select from options
The user enters the text of the question in the "Question" text box. It then selects the number of question options. After entering the individual options, it marks the ones that are correct and indicates the number of points for each option in the relevant line. The total number of points for a correctly answered question shall be indicated in the appropriate box below the list of options for answering the question. If he wants to allow the tested person to select only one option when performing the exam, he will mark this option.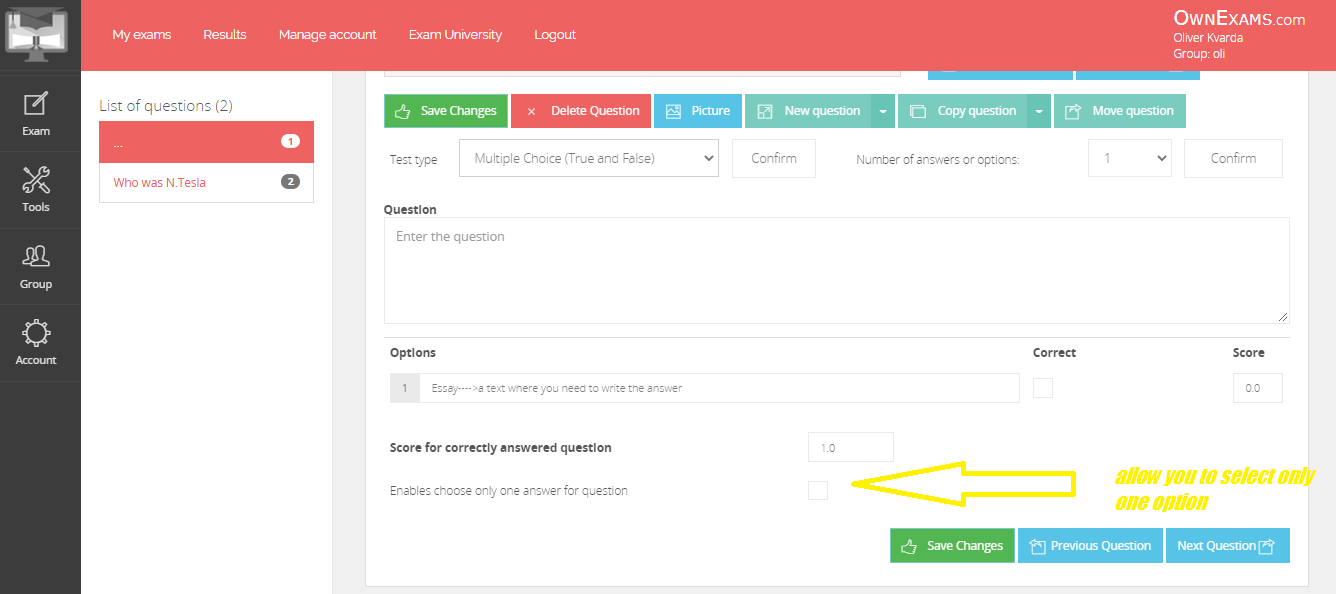
B / Short answer
The "benevolent check" function in this type of question is used to ensure that the system does not distinguish between uppercase and lowercase letters, unnecessary spaces, and the order of answers for short answers when checking for correct answers. We recommend naming the individual options separately into several options, as shown in the example in the figure.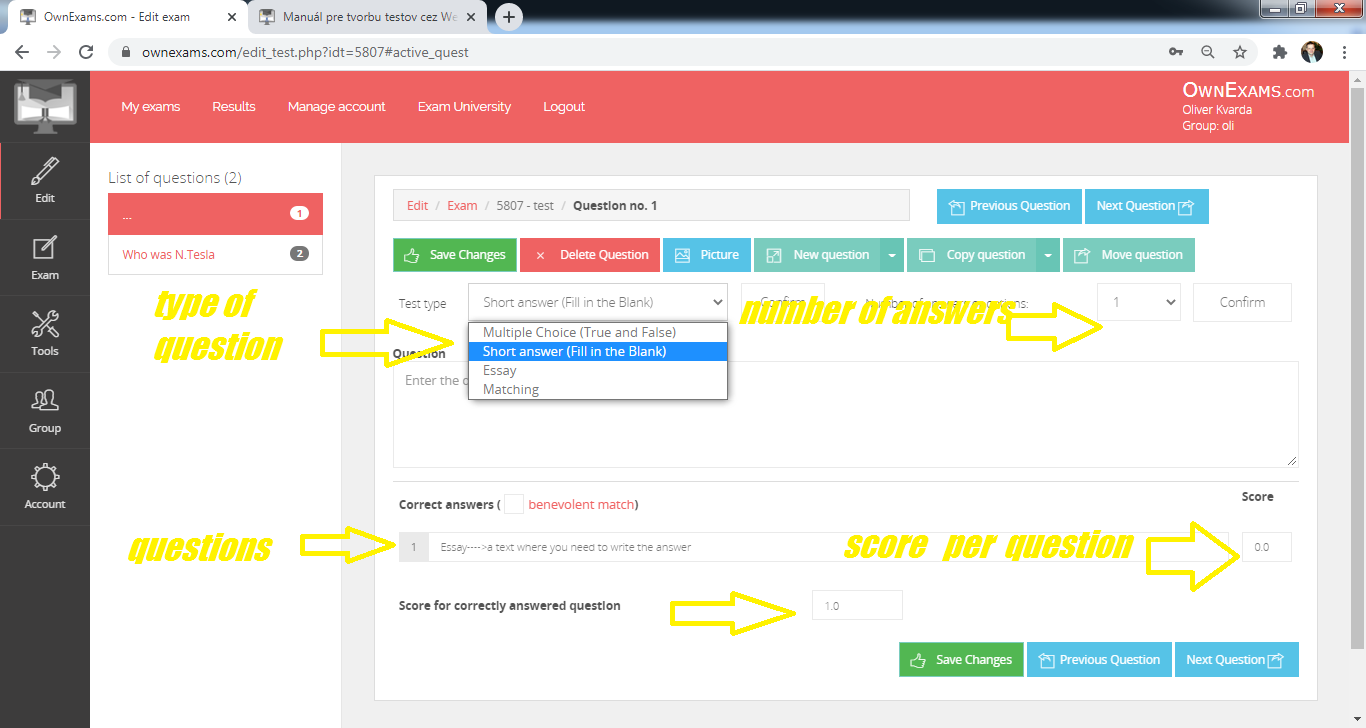
C/ Essay
In this type of question, the user enters only the wording of the question and states the total number of points for a correctly answered question. You evaluates the question personally when checking the answered exam in the results.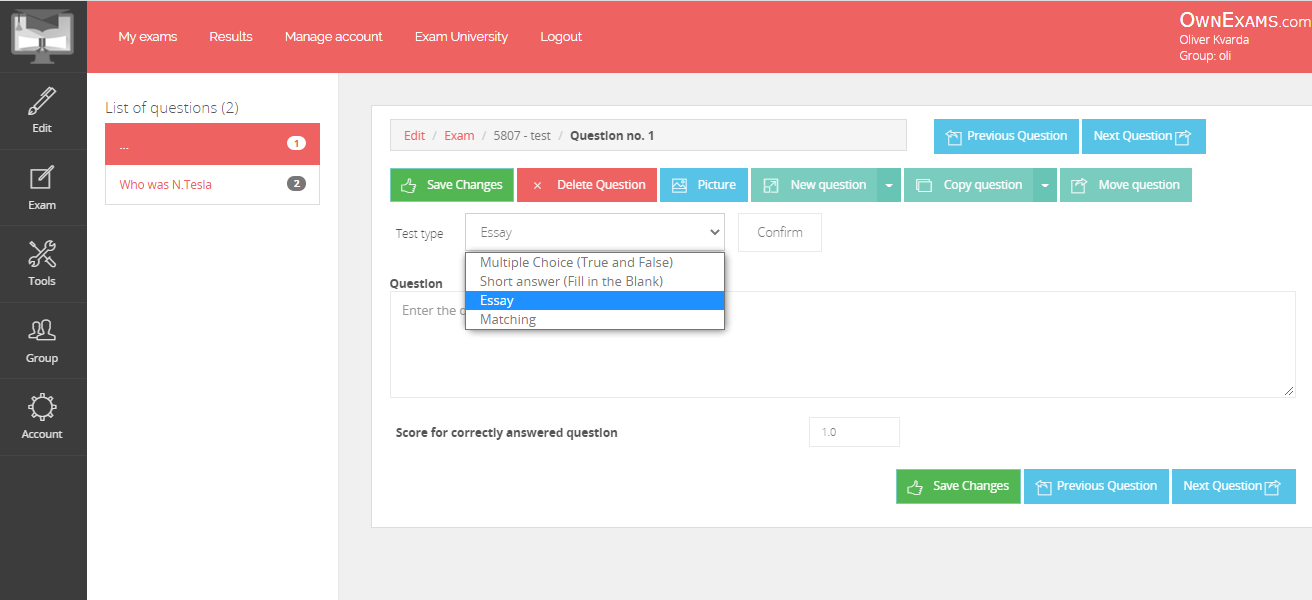
D / Assignment
In this type of matching question, individual matches are entered in each line. The left expression is assigned to the right. When performing the exam, the terms on the left are displayed for which the tested subject selects from all the options on the right.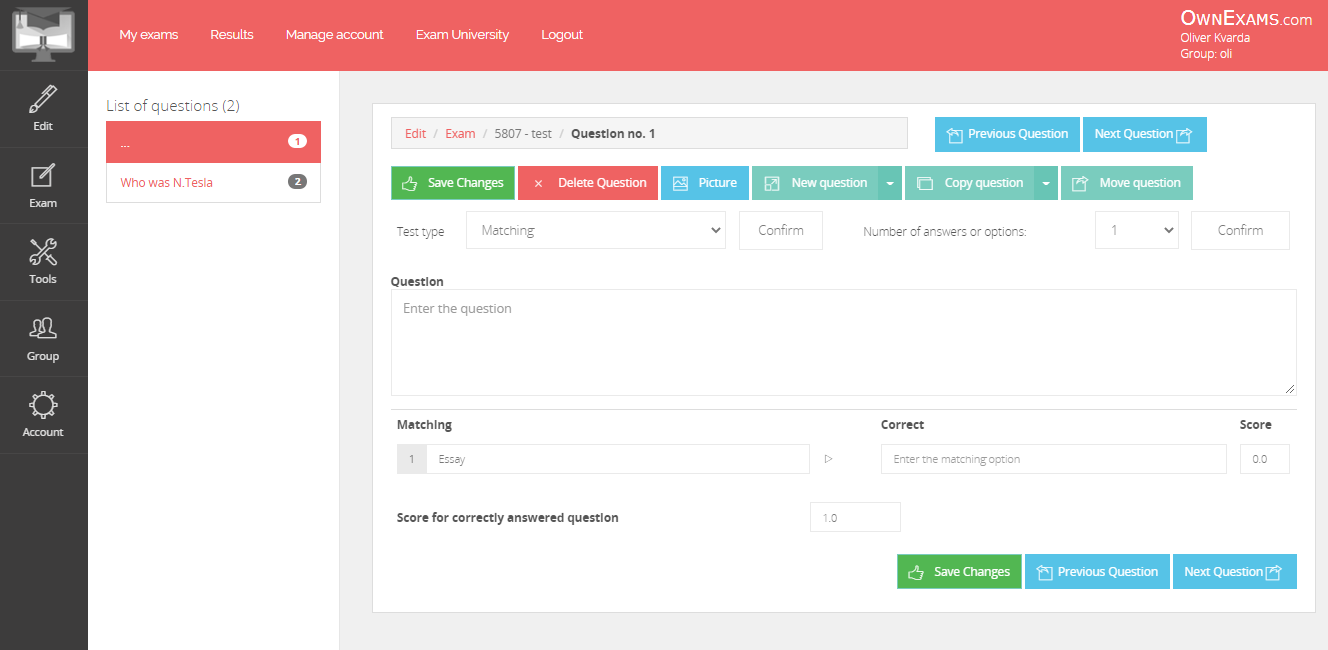
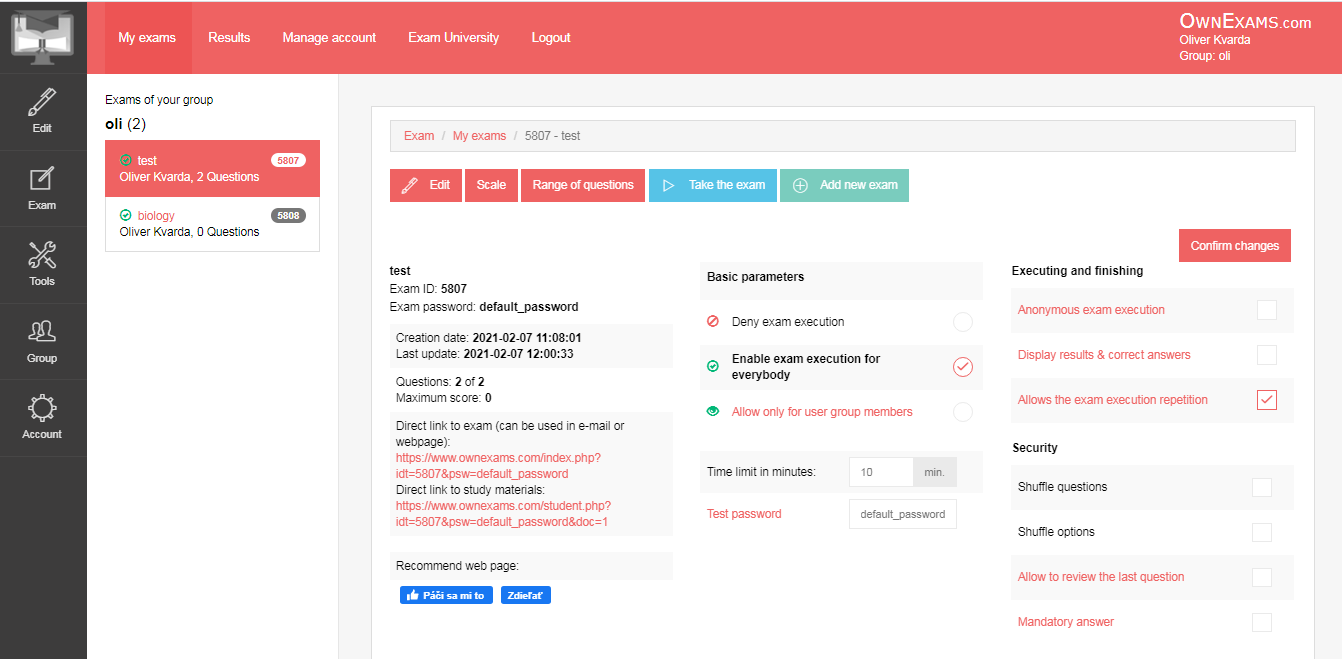
1.5.3 Exam parameters
After saving the exam questions, it is necessary to adjust the basic parameters of the exam. In "My exams" the user selects the exam whose parameters he wants to modify. Here he can see basic information about the exam as its name and ID. Using this tool, it is possible to enter a new exam, or go to modify or run the selected exam in the group tests. When the exam is run, the user sees how the exam questions will be displayed to the tested person when the exam is turned off.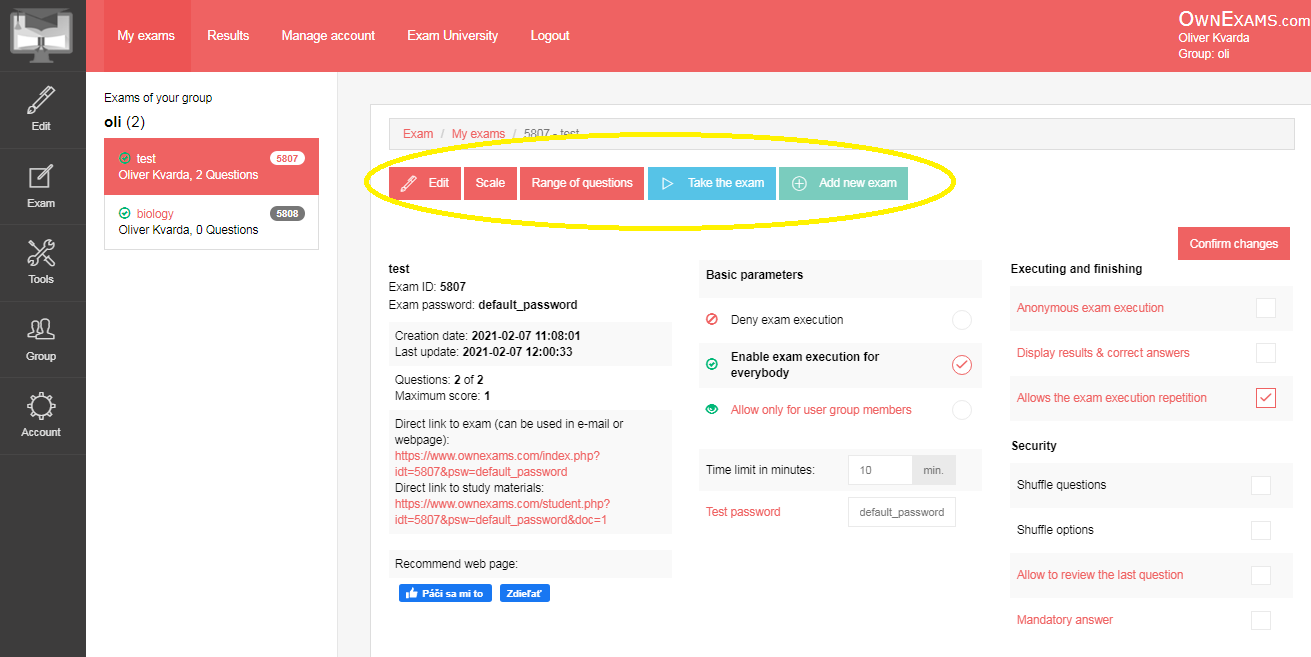
The exam can be performed anonymously by selecting the line "Anonymous exam execution", which starts the exam without entering personal data. It is also possible to allow the same user / exam user to view the evaluation of each question after the exam has been performed and to allow the exam to be re-run. Alternatively, it is possible to allow the exam to be repeated by the selected user in the exam results.
After marking the individual options, the user can create an exam, for which the following will apply:
- randomly changes the order of questions,
- randomly reorder options
- be able to reconsider the last question, which allows you to view and change the answers to this question during the test,
- requires a mandatory answer to each question - without answering it, it is not possible to move on to the next question.
1.5.4 Scale and certificate
The application supports an arbitrary classification procedure, ie according to a predetermined transformation key - scale. Each user can set their own rating scale for each exam. The scale may contain a verbal or numerical evaluation depending on the success achieved. In this window it is possible to set the number of marks that the scale should contain (eg from 1 to 5, A - FX, etc.). If the user wants to change the number of ratings for the exam, it is enough to change the number of rows for the given scale. The existing scale can be changed at any time. The evaluation according to the changed scale will be reflected only for exams that will be performed after this change. However, it is possible to recalculate the evaluation already for the existing results for the selected class or for all classes at once for a certain period. If the teacher wants to use the created scale for another exam, he can simply copy it to another exam by clicking on the appropriate button.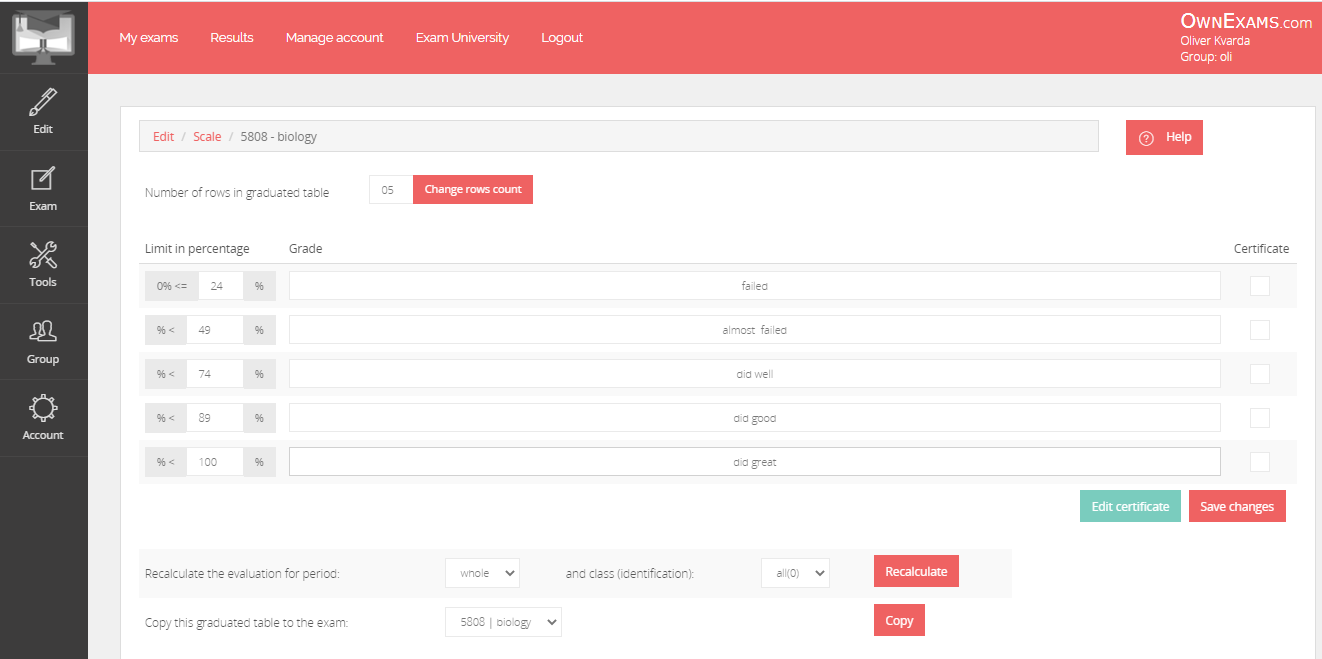
In this part it is possible to proceed to the modification of the certificate, which is also available through the tool "edit" - "Certificate". As for the possibility of creating and modifying the certificate, it is necessary for the user to have basic knowledge of programming or ask website administrators to create one.

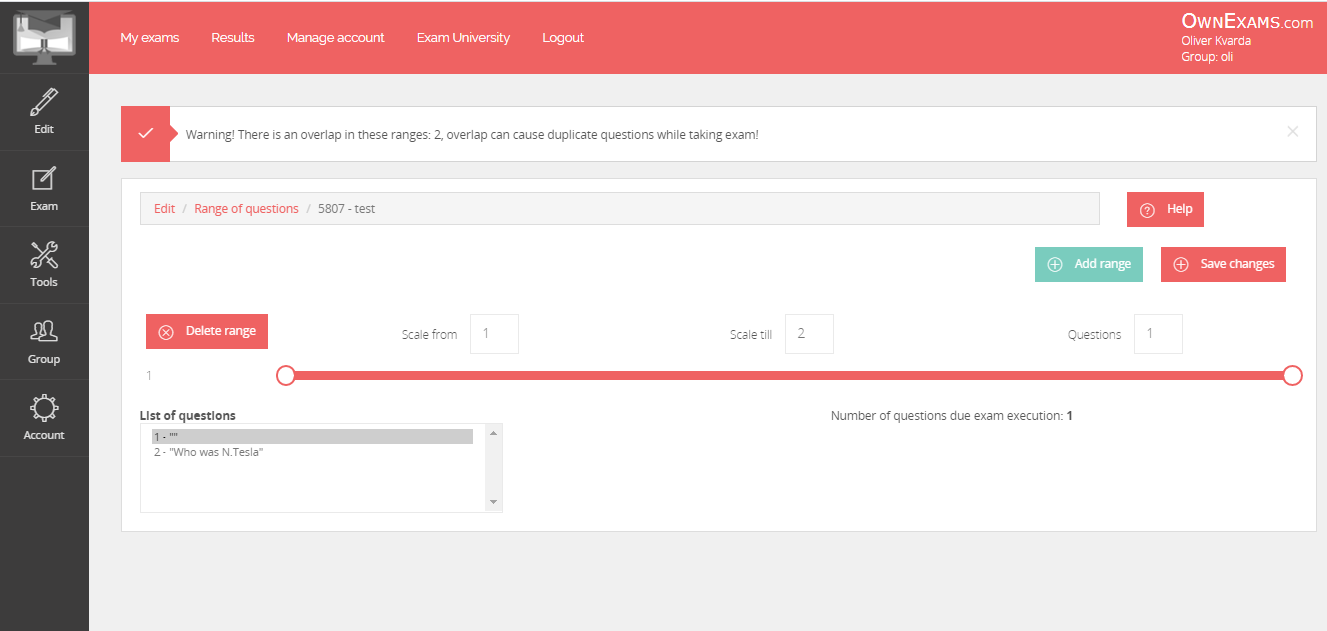
1.5.5 Scope of questions
In the section "Edit" -> "Range of questions" the user sets the number of questions that the tested person will be able to answer. In the list of tests, exams or quizzes in "My exams", select the exam whose range you want to modify. If he did not define the scope of the questions, the tested persons must answer all exam questions. If the test taker wants to answer 10 questions, but the exam itself contains 20 questions, he simply sets the range as follows. First, add a range using the "add range" button. The "from - to" range can be entered in the appropriate fields, or set via the slider by swiping left / right. All changes must be saved.The range of questions can be changed or deleted at any time. A list of test questions is also available to the user in this section to help determine the scope.
1.10 Exam tools
Exams are shared within a group and each member of the group can create, edit exams, or correct exam results, etc.The user can rename the tests, exams or quizzes via the "Tools" -> "Rename exam" function, or by clicking on the exam name when editing the exam questions.
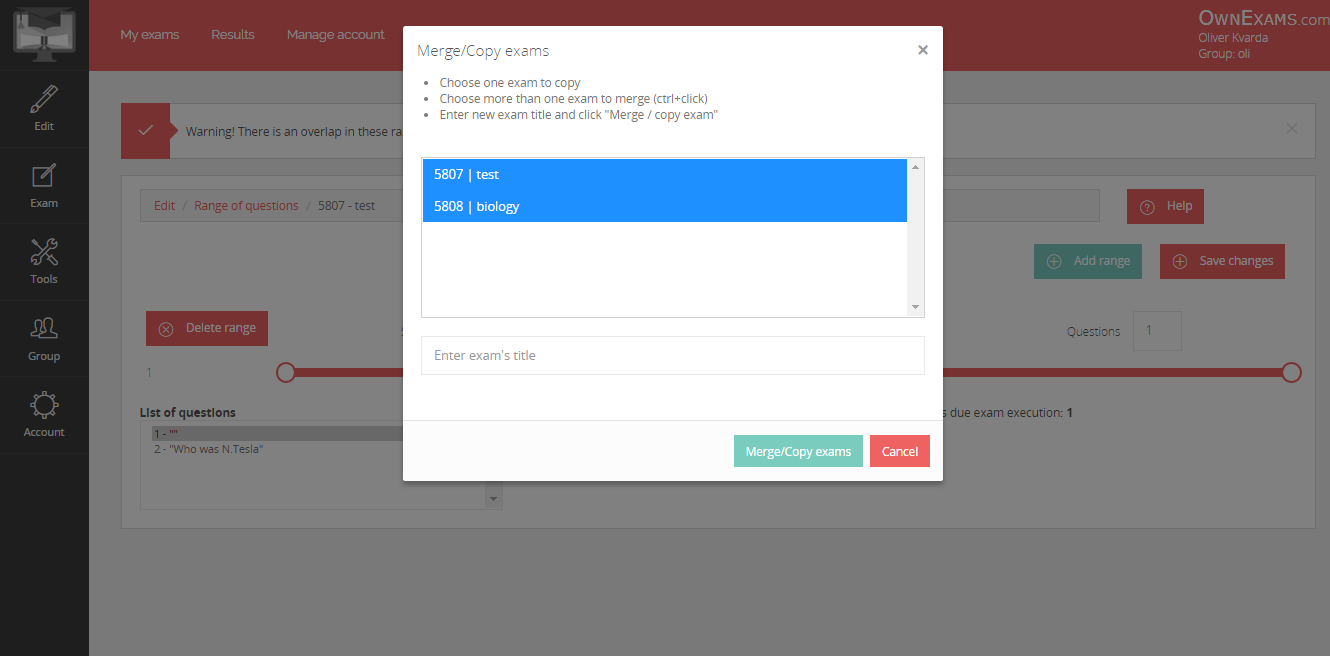
Exams can be copied or joined using the tools in "Join / Copy Exams". When copying, simply mark one exam and enter the name of the exam in the box and confirm the copying of the exam with the "Join / copy exams" button. If the user wants to join two or more tests, exams or quizzes, he needs to use the keyboard shortcut "ctrl + click" to highlight the exams he wants to join, enter the name of the exam in the box and confirm their connection, as when copying, using the "Join" button. / copy exams ".
The "Export exam" and "Import exam" functions in the tools are used to transfer tests, exams or quizzes to different groups. The export transfers the exam, some parameters and the scale to the exam. The exported file can be imported in any other group.
The individual exams can be hidden with the tools if the user does not use them. Hidden exams will not appear in the list of exams or in the results and statistics.
The user also has the option to test the selected exam via the "Exam" -> "Exam test" tool. This tool allows the teacher to set the optimal time to perform the exam, check it and see how it appears to the person being tested. The results of the exam performed in this way will not be displayed in the results or in the statistics.
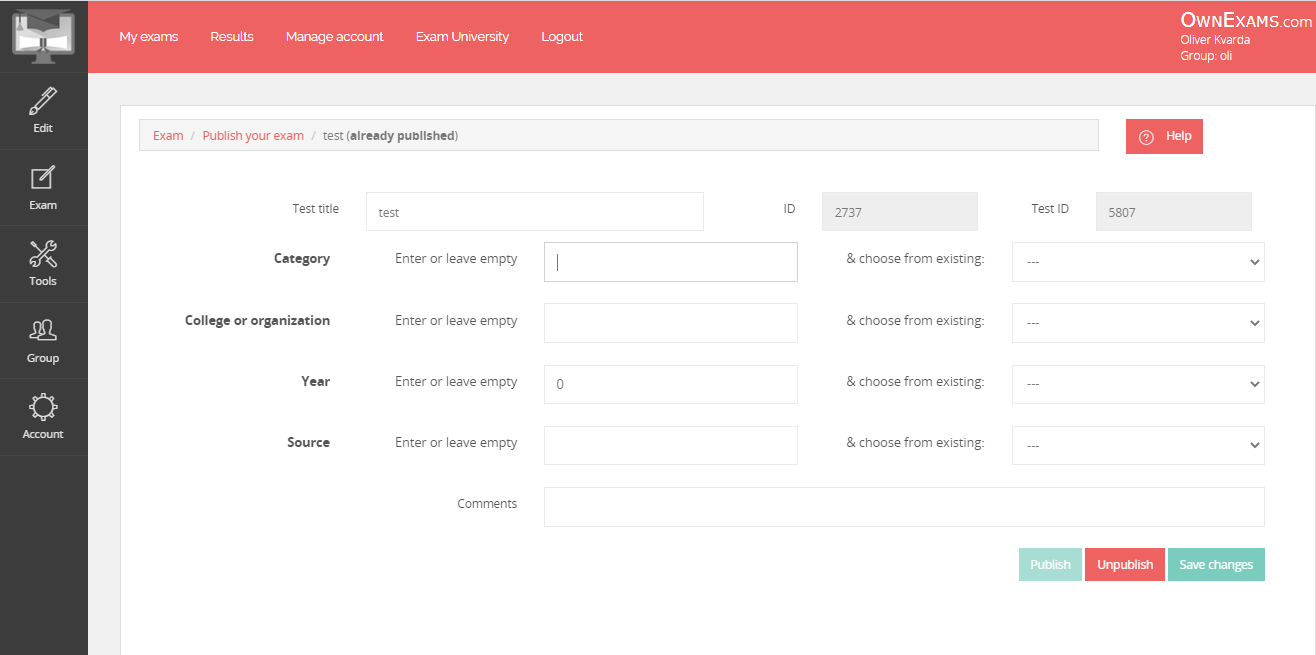
Only the group administrator can publish the tests in the "Exam Catalog". In the section "Exam" -> "Publish test" it is necessary to enter or select basic information related to the published exam such as category, school / organization /, year and source. The exam is published in the exam catalogue at ownexams.com.
Within the "Exam" tool, the application offers the user to print a blank exam or to print the correct answers for the paper form of the exam.
1.11 Study materials
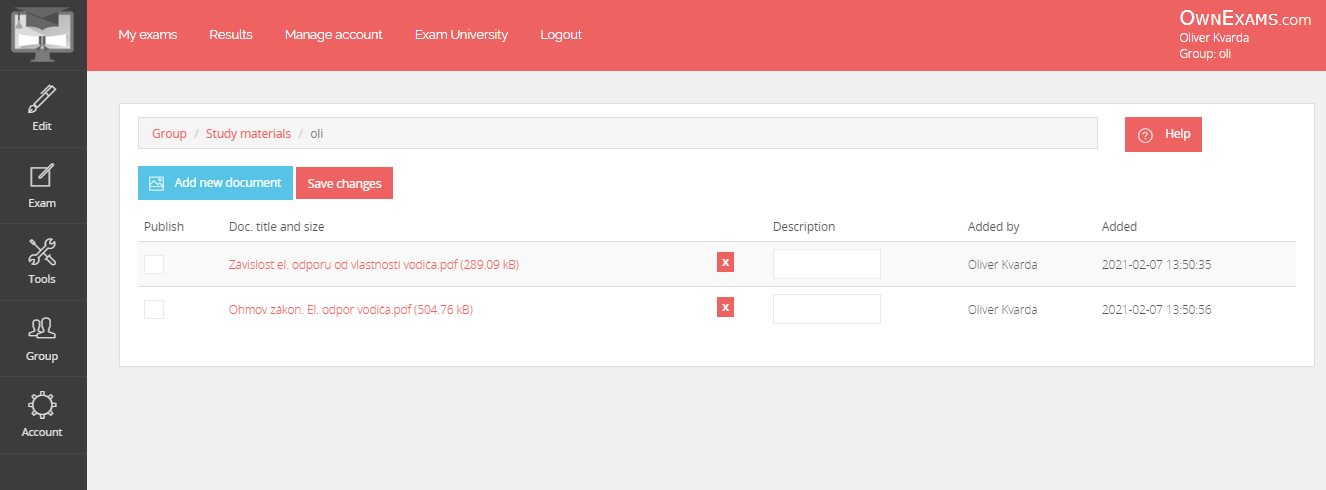
Through OwnExams.com, it is possible to publish study materials that can be added and managed using the "Group" -> "Study Materials" tool. All documents are shared within the group. The maximum size of one uploaded file is 10 MB. Supported document formats are DOC, DOCX, PDF, TXT, PPT, PPTX, XLS, XLSX, ZIP and RAR.The document can be uploaded using the "add new document" button. All changes must be saved using the "save changes" button. Individual documents can be deleted using the "X" key in the relevant line (if it is not used for any exam). The user can add a description (eg the name of the subject to which it relates) to each document.
,
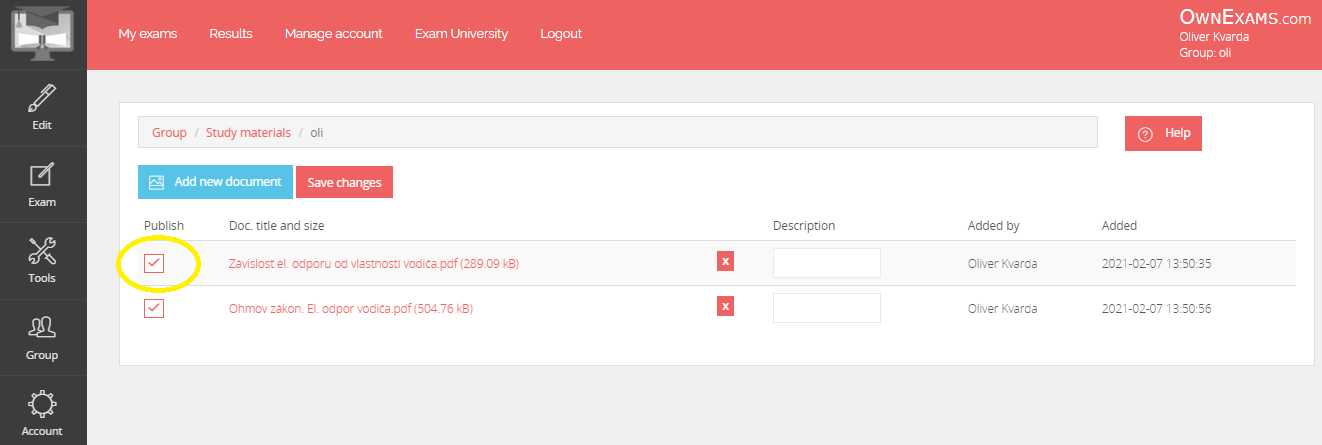
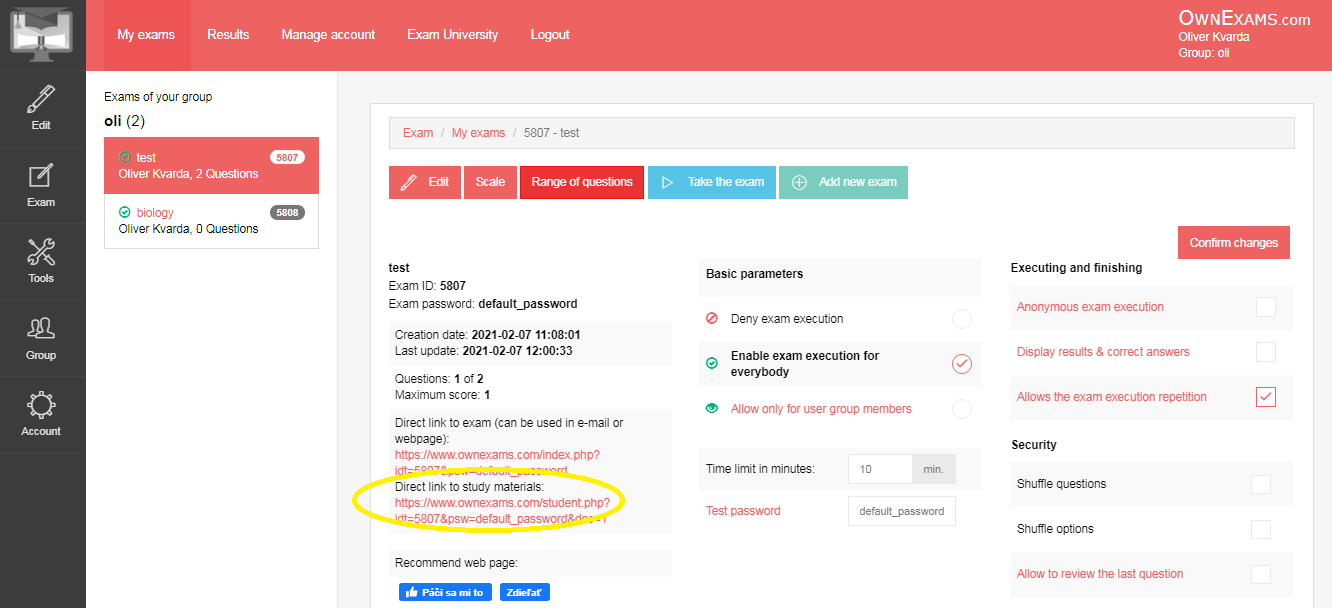
If the user wants to publish the study material, he must first select a specific exam in "My Exams". He then selects the material he wants to publish in the "publish" column among the study materials and saves the changes.
The user can distribute study materials to specific persons in two ways (in the section "My exams"):
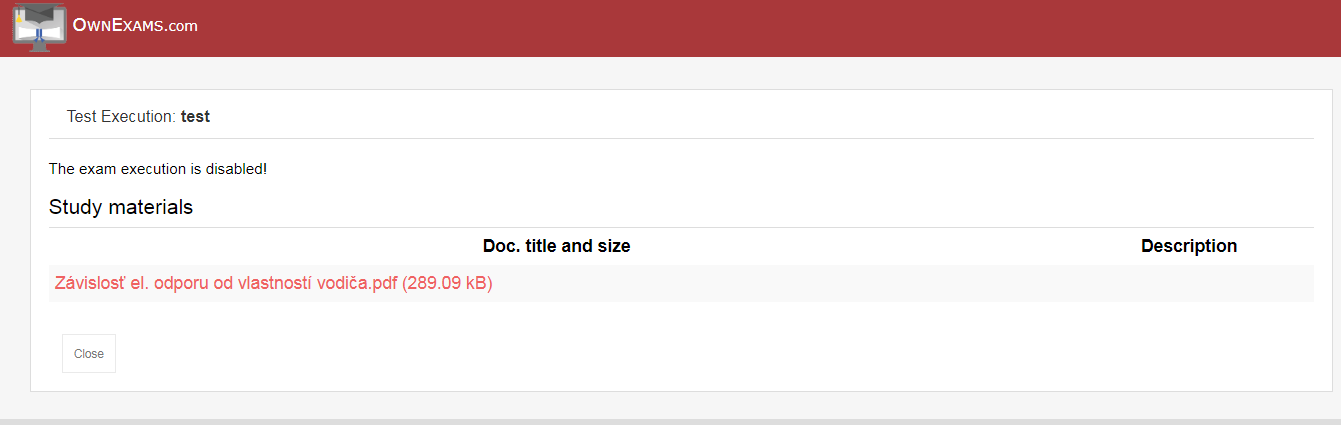
- Direct link to start the exam - if the basic parameters are disabled in the basic parameters, when starting the exam, a list of study materials that can be downloaded will be displayed.
- Direct link for study materials - after clicking on the link, a list of study materials that can be downloaded will be displayed.
1.12 Results and statistics
Exam results are available in the "Group" -> "Results" section. In the results, the user can manually correct the results of the people tested in a particular exam in case the system does not evaluate them correctly.In the left part there is a filter, through which you can set the period in which the exam was performed. Next, it is necessary to select the exam, the results of which the user needs to display. Groups of people (or classes) are displayed in the "ID (class)". In the results, the user can then go through the individual tests, exams or quizzes performed and change:
- ID (class) - if the examed person did not enter the class or entered it incorrectly, the user can change it and thus place the examed person in any class.
- e-mail of the examed person,
- vyhodnotenie otázky (correct/incorrect),
- total points.
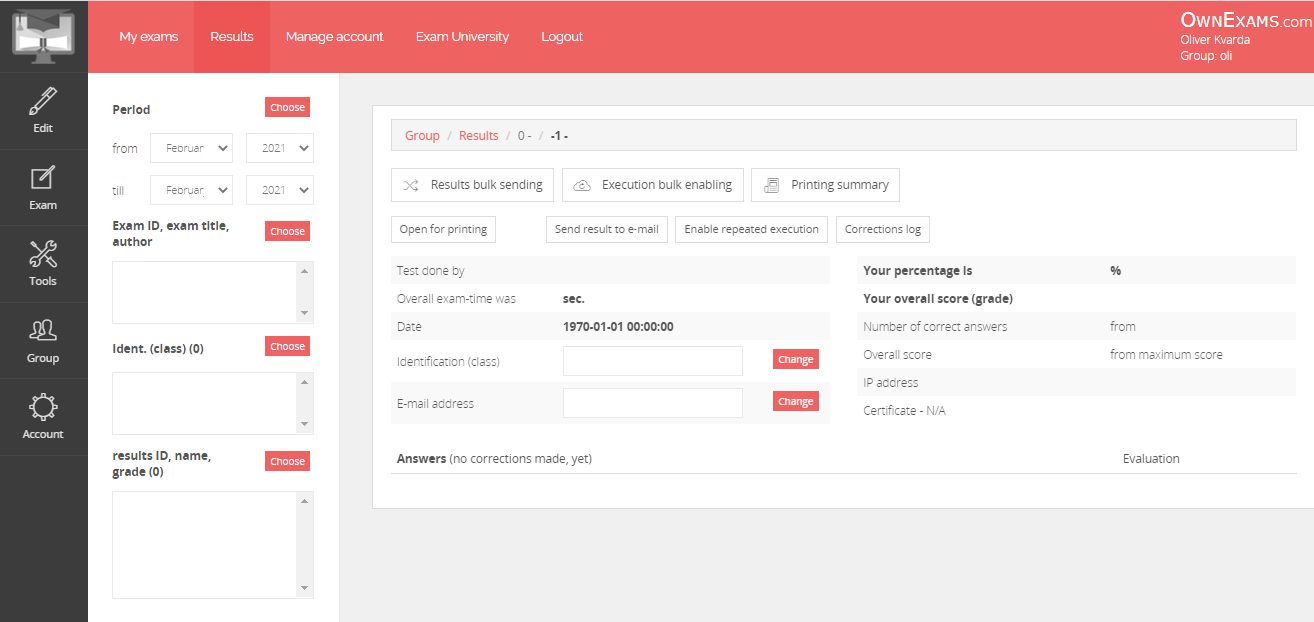
The name of the person who performed the exam, the duration of the exam and the day the exam was performed are displayed at the top. In the upper right part, the user can see his success (in%), the overall rating, the number of correct answers, the number of points, the IP address and the granting of the certificate.
The correct answer, the number of points awarded, the maximum possible number of points per question and whether the exam was performed after the time limit are also displayed. Questions answered by the exam taker after the time limit expires 0 points. However, the user can also accept these answers and change the points.
The accuracy of each answer is compared with the answer given when creating the exam exactly or benevolently (differences in punctuation, case and unnecessary spaces are tolerated). For the performed exam, it is possible to allow re-execution for a specific person, but also for the whole class. After performing the exam again, the results for the first exam will not be lost.
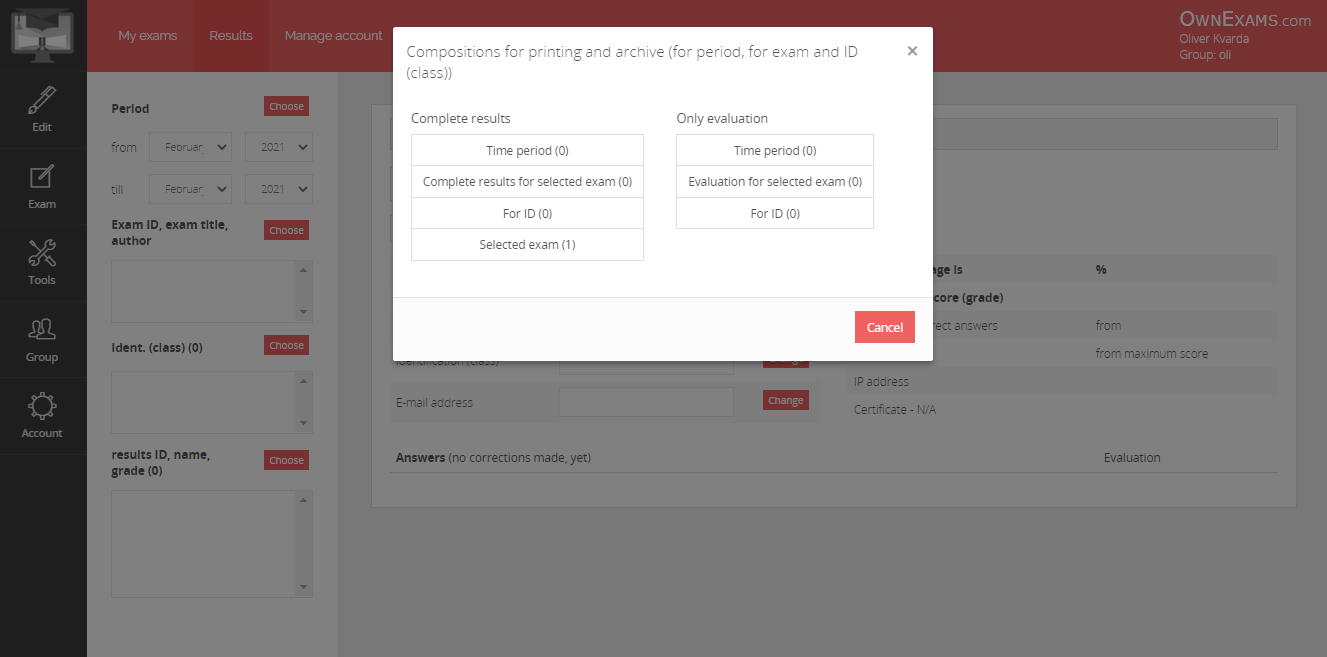
The user has the option to e-mail the results to the tested persons individually or in bulk, and allow the exam to be performed again. Using the "print reports" function (see picture ...) you can select different variants of printing the results in a group.
Within the "Open for printing" function, the results can be sorted in ascending or descending order according to the individual options before the actual printing.
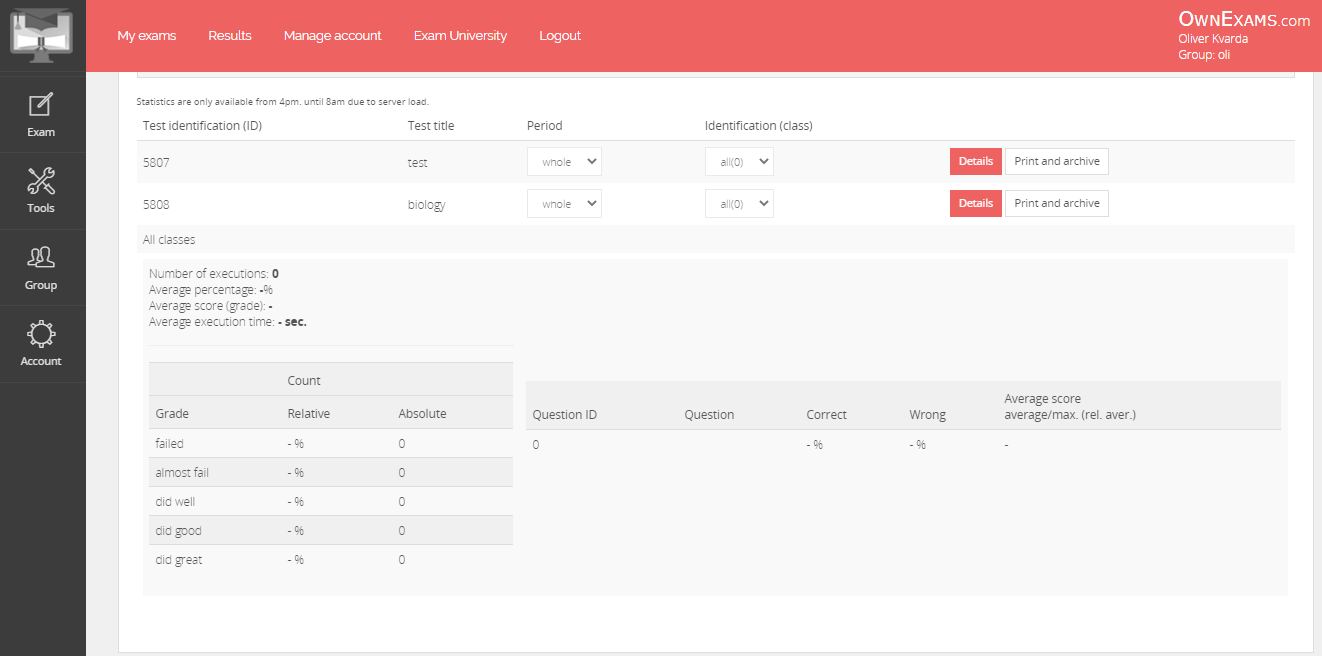
The user will find the exam statistics of the group in the section "Group" -> "Statistics". After selecting the period and ID (class) in the relevant line of the selected exam, it can display the following statistics:
- number of exams performed,
- average success rate in percent,
- average rating (grade),
- average exam time,
- the relative and absolute number for the mark in question,
- the average score of the relevant question,
- How many correct and incorrectly answered questions were answered
1.13 Starting the exam
After the tested person has received the necessary data (exam ID and password) from the user (professor), they can proceed to the exam in the "Run exam" section. The exam can also be run directly via the direct exam start line, which the user will find in the "My Exams" section.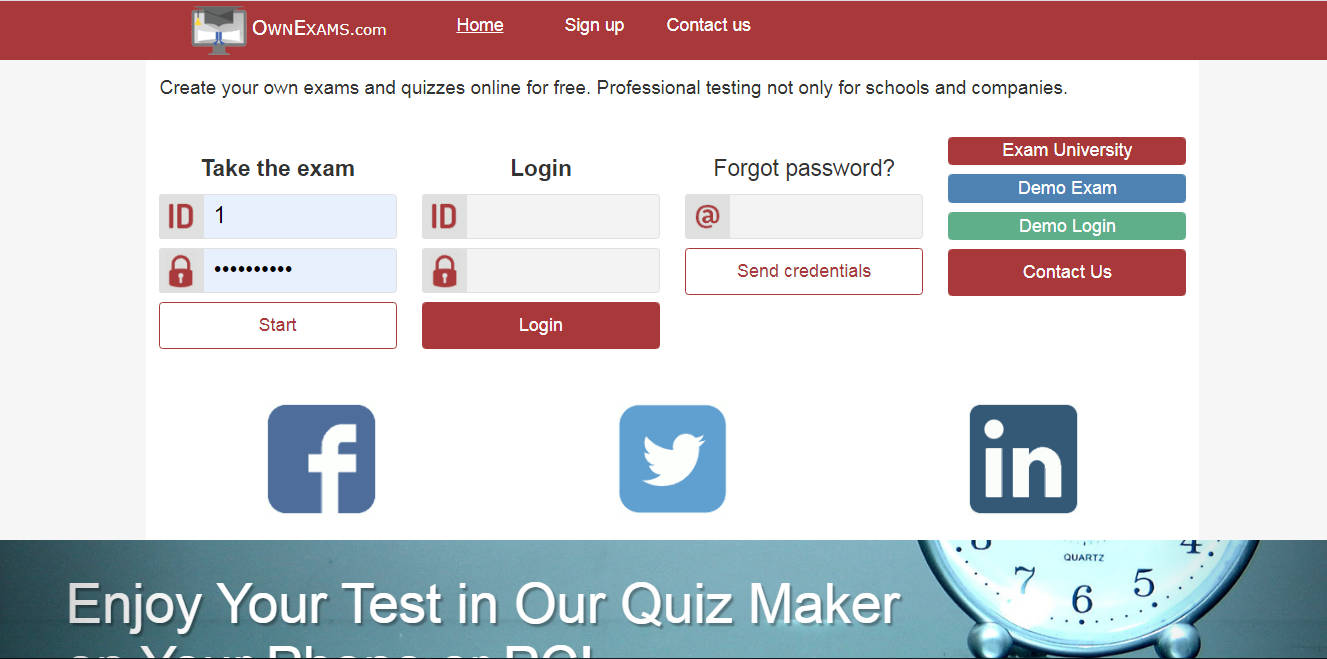
Once started, the tested subject will see pre-test instructions, number of questions, and exam duration. After entering the required data (name and last name), he can proceed to the exam.

If the user allows the exam to be performed anonymously, only the exam instructions, the number of questions, and the duration of the exam are displayed before the exam is started. In this case, it is not possible to enter any data about the person being tested.
